One of the biggest misconceptions among website owners is that SEO only needs to be done once. Unfortunately, this isn’t the case.
Numerous fractions are altered during redesign including code and pages. If they are not properly handled, it can negatively impact the website’s SEO and affect the long-term growth of the site. If done correctly, however, redesigning a website can also increase your SEO strength.
In today’s article, we will go through a detailed guide on how to redesign your website without affecting SEO.
Step 1: list of all pages from the old website
The first step is to download the URL structure of your website. Redesigning means a lot of changes which will also affect the URL re-structure. It is important therefore to back it up otherwise you run the risk of impacting your website ranking.
You can use plugins to get the URL structure. If you are using Yoast SEO plugin, you can crawl the website and then download the updated sitemap.
Step 2: the redesign needs to be done on a temporary URL
Never do the redesign on your existing website. It can cause visitor issues and give you problems in the long run. The best approach is to copy your site and set it up into a temporary URL. Once done; you can start making changes to it. An alternative would be to switch the domain once all the required redesign changes are made.
If there is a potential for you to struggle with this, you can always get help from your developer. Another option would be for a hosting company to do it for you. It is important for you to ping your hosting provider to do the setup for you as this step will protect you from unforeseen issues in future.
Step 3: test the new website
Great, you copied your existing website into the new website.
However, before you start your redesign project, it is a good idea to do an end-to-end checkup of your website. In this checkup, you should look at multiple aspects of your website including broken links, features, CSS, etc.
You can also use the XENU, a free-to-use tool that will find all the broken links on your website.
Step 4: do proper 301 redirects
The next step is to do 301 redirects between old and new URLs. For example, if you have an “About Us” page on the old website, and its URL was “www.yourwebsite.com/aboutus.html.”
If during the redesign, your designer changed the URL to “www.yourwebsite.com/about-us.html” – it is better to implement proper 301 redirects to ensure that both URLs work and you don’t lose SEO benefits gained from your previous URL.
If you don’t do it correctly, the search engine will get 404 web pages not found. By doing 301 redirects, the old URL will be redirected to the new one. This is the technical way to tell the search engine that the URL has been changed. Google will not downgrade your previous SEO efforts.
You can add redirects using the .htaccess file. It would look like the following code.
Redirect 301 /oldwebsite http://yoursite.com/new-url
If you are confused and don’t know how to do it manually on WordPress, you can also try out redirect plugins that let you do it by filling in a form.
Note: This step is very important, and you should do it no matter what.
Step 5: make the jump to the new website
Once everything is finalized, both design and redirection, it is time for you to switch to the new website. You can also make an incremental change in stages if your website is big.
Step 6: run Google Webmaster tools
The next step is to ensure everything has been successful so far.
To do so, you can utilize tools such as Google Webmaster. This tool will enable you to check there are no broken links. If you are any broken links found, to avert penalty it is advised to get them fixed quickly.
Step 7: check verification status and re-submit
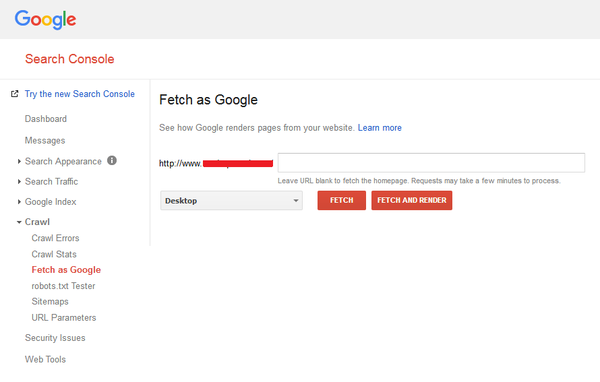
It is common for developers or designers to stop the search engine to crawl the website. If that’s the case, then you will need to resume the crawler on your website. To check the status, you need to use the “Fetch as Google” option under crawler. Once done, click on the “Fetch and Render” option. If both tests return positive – your website is entirely crawlable.
Also, it is advised to check if the redesigned website is verified. You can do so by logging into the respective webmaster’s tool provided by Bing and Google. If it lacks verification, then redo it and claim your website.
And finally, re-submit your website URL into Google index by clicking on “submit to index” button.
Step 8: Robot.txt
During the redesign, there is a chance that your robot.txt file can get corrupted. To check if it has, you can use “robot.txt” option under crawl.
Step 9: sitemap submission
As your website now has a new and modified structure, submit the website XML to Bing and Google. Once submitted, your new website will be crawled in the coming hours.
Step 10: monitor the changes
Finally, it is important to monitor the changes and look for any potential growth. Keep a close tab on the rankings of your top keywords. There are many SEO tools available that enable you to keep track of these keywords. If there is a considerable change in your SEO, then endeavor to understand why this is happening and look to find a solution if your website traffic slows down quickly.
You should monitor your website for at least two to three months.
Author: Pawan Sahu is a digital marketer and blogger at MarkupTrend.
source https://searchenginewatch.com/2018/07/06/a-guide-to-redesigning-a-website-without-affecting-seo/


No comments:
Post a Comment